Once upon a time I started my very first blog. Although that one is retired, it was a wonderful learning experience and gave me the confidence to start the two sites that I manage today. Rather than filing all the old posts away, I’ve decided to bring a few back from the archives, including one of my favorite sewing tutorials – Hot Air Balloon Dress. Enjoy!
CRAFTS & SEWING
Hot Air Balloon Dress
November 3, 2015
The following content may contain affiliate links. If you purchase something from the links, we may receive a commission.

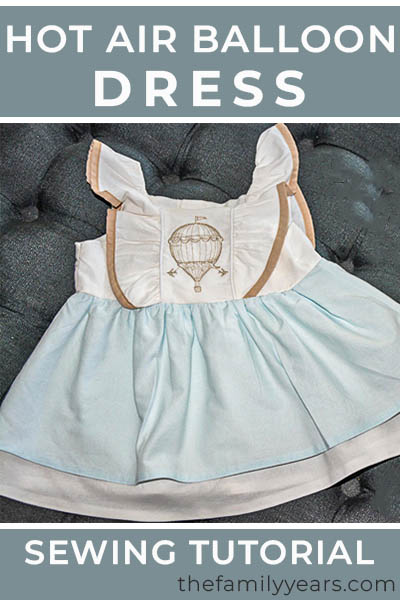
Inspired by our daughter’s first birthday theme, Balloons Over Paris, the Up, Up, and Away Hot Air Balloon Dress consists of a white bodice embroidered with a gold hot air balloon design.
The dress features white ruffles with a khaki edging and a double layered gathered skirt in blue and white. It was created using the Simplicity Pattern 1470A with some adjustments including the addition of buttons and a continuous bound placket instead of a zipper. Other changes include moving the ruffle from the arms to the chest area, doubling the skirt, and adding bloomers.
Hot Air Balloon Dress Pattern
For this specific dress, I knew what I wanted the dress to look like, but I didn’t have an exact pattern on hand. The Simplicity pattern is a great pattern on its own, but is also very versatile and can be easily altered for a new look. This is probably my favorite pattern right now and I’m sad to say that we are about to outgrow it. If you are looking for an easy to intermediate dress pattern for little girls, it really is a must-have pattern for your sewing collection!
A special touch that really makes this dress stand out is the beautiful hot air balloon embroidery design. I used the Brother HE-1 Computerized Embroidery Machine and this embroidery design from Urban Threads (which is still available in 2023!). If you don’t have your own embroidery machine, a local embroidery company should be able to transfer the design on your fabric for you for a small fee.
Materials List
- Simplicity Pattern 1470A
- McCall’s Pattern M6872 (if making bloomers)
- Kona Cotton in Sky (skirt)
- Kona Cotton in White (bodice and lining)
- Kona Cotton in Khaki (ruffle edge and bloomers)
- Bias Tape Maxi Cord Piping 1/2″ in White
- Dual Duty General Purpose Thread in White
- Dual Duty General Purpose Thread in Tan (used for alternative edging)
- Colors by Favorite Findings 5/8″ Buttons in Cream
- Poly Embroidery Thread in Beige Color #843 (hot air balloon dress embroidery design)
Sewing Tips
– ALWAYS pre-wash, dry, and iron fabric before starting a new sewing project.
– Make sure your needle is sharp and sewing machine is clean.
– When using an embroidery design, add it to your fabric before cutting the pattern out. If you are new to machine embroidery, it is much easier to center the pattern around the design than vice versa.
Hot Air Balloon Dress Pattern Pieces
Cutting out the Bodice Front
Before cutting out the fabric for the bodice, add the hot air balloon embroidery design to your white fabric. Then, cut 1 of fabric and 1 of lining. For the bodice front, you will need to cut it into 3 pieces to incorporate the ruffle and piping into the chest area. To do this remove about 3/4″ from the center fold of the pattern. I fold the pattern over, instead of cutting it off.
*The bodice should be in one piece at this point.
You will need to cut the bodice in half down the center chest to create the front sides of the bodice. It will give you about 5/8″ on both the left and right front bodice in the chest area (this is for your seams).
Cut out the Embroidery Design
After that, cut out the embroidery design in a rectangle, making the height the same as your bodice pattern, and adding about 1/2″ to each side.
For the lining, pin your bodice front pieces together (removing the seam allowance) and trace the bodice front as one piece.
Cutting out the Bodice Back
Cut 1 of fabric and 1 of lining in white. For the bodice back, you will need to cut it into 4 pieces to incorporate the ruffle, piping, and addition of buttons. For the pattern, fold the inside of the center back over where there is only 1/2″ from the inside shoulder strap. Cut one for each side. From the folded edge to the center back, add 1″ and cut two pieces. This should be enough additional fabric to add the buttons and button holes.
For the lining, pin your bodice back pieces together (removing the seam allowance) and trace the bodice back as two pieces.
Cutting out the Ruffle
Cut 2 ruffles in white. For the alternate edging, cut (2) 1″ size strips along the curve of the ruffle in khaki.
Cut out Bodice Side Front and Back
Following the Simplicity dress pattern, cut 2 of fabric and 2 of lining in white for both the bodice side front and the bodice side back.
Cut out Skirt Front and Back
Cut 1 full length skirt pattern in white for the skirt front and the skirt back. Then, you will cut 1 skirt pattern minus 2 inches in length sky blue for the skirt front and skirt back.
Hot Air Balloon Dress Sewing Adjustments
Create the Ruffle
We are going to add an alternative fabric edging to the ruffle to give a nice contrast to the bodice of the dress. To do this, press the alternative fabric (khaki) in half, open it up, and press in each side to the crease. Pin the alternative edging to the outer edge (curved side) of the ruffle and stitch in place. Gather ruffle on the flat edge.
There are several ways to gather fabric to create a ruffle, but my preferred way is to use a ruffler foot attachment for the sewing machine.
Sewing the Bodice
Before we can follow the sewing directions from the pattern, we’ll need to put the bodice pieces together. With right sides together, sew the outside bodice front to the outside bodice back at the shoulders. You should have two separate pieces (the left and ride side of the bodice).
Lay down the ruffle (right side up) going from the front bodice, over the shoulder, and down the back. Then add the bias tape maxi piping with the raw edge on the left (cut it to the length of the bodice piece – one for the front and one for the back). After that, layer the side bodice (right side down – front and back respectively). And finally, place the center bodice right side down. Stitch in place. Follow the same instructions to connect the other side of the bodice to the center bodice.
Back to the Pattern Directions
Once your front and back bodice is together, you can continue with the sewing directions on the pattern from step 4 through step 12. After step 12, add your buttonholes to the back of the bodice.
Sewing the Skirt
For the skirt front and back (white and blue), press up hem at the bottom of the skirt. To form a narrow hem, tuck under again and stitch in place.
Gather at the top of the skirt front and back (both colors). Cut a line in the center of the skirt back approximately 3 – 4″ long (both colors) for the continuous bound placket. I used the blue fabric to create a double fold bias tape which I then added to make the continuous bound placket. A continuous bound placket is not required, but it does make it substantially easier to get the dress on and off.
Finishing Touches
Pin the skirt top (blue) to the skirt bottom (white) where the wrong side of the blue is on top of the right side of the white. With the bodice front right side up, lay the skirt front on top of it right sides together. Adjust the gathers of the skirt and sew in place. Finish the edges with either a serger or zigzag stitch. Repeat this for the back bodice and skirt back.
Finally, with the dress right sides together, sew the sides and finish the edges. Turn right side out, press, sew on your buttons, and you’re done! If your little one is still in diapers, don’t forget to make the bloomers!
IF YOU ENJOYED THIS HOT AIR BALLON DRESS SEWING TUTORIAL, YOU MAY ALSO LIKE –


