Once upon a time I started my very first blog. Although I have put that one to rest, it was a wonderful learning experience and gave me the confidence to start the two sites that I manage today. Rather than filing all the old posts away, I’ve decided to bring a few back from the archives, including this popular one – Easy DIY Flower Arrangements Part 2 which has been retitled, DIY Baby’s Breath Centerpiece. Enjoy!
PARTIES & ENTERTAINING
DIY Baby’s Breath Centerpiece
February 20, 2014
The following content may contain affiliate links. If you purchase something from the links, we may receive a commission.

DIY Baby's Breath Centerpiece
In our first floral arrangement tutorial (How to make an Easy DIY Boutonniere), we discussed how to make a simple baby’s breath boutonniere as well as a groom’s boutonniere using stock. As with the first tutorial, the examples used for arrangements in this tutorial were the actual flowers that I used in our wedding, although they could just as easily be used for any special event including bridal showers, baby showers, homecoming, prom, etc.
For our wedding, I had decided early on that I was not going to use a florist. The main reason was simply to save money. Without formal training and very little floral experience, that meant I needed a centerpiece idea that was simple to make, relatively inexpensive, and would hold up if made ahead of time. That is how this DIY baby’s breath centerpiece came to be.
Originally, I searched through Pinterest, Google, wedding websites, etc. for ideas on centerpiece arrangements that didn’t use flowers, but the few that I did like were going to be quite expensive, so it didn’t really help with saving money. Then, I came across some ideas that used baby’s breath.
It was the perfect flower centerpiece for a vintage-inspired wedding – a round baby’s breath ball on a mercury silver candlestick holder. I loved its simplicity and elegance. Using baby’s breath would also be very cost effective as well as durable in holding its color.
There are so many great things about working with baby’s breath. It is an easy and inexpensive flower that doesn’t require as much water or temperature requirements as other flowers. These arrangements were made on Thursday for our wedding which took place on a Saturday evening, and they looked great!
Making a round ball with flowers is one of the simplest arrangements you can make. It can be made with any flower, but some are heavier than others so it’s essential that the base will be able to support the weight. Since I was using a candlestick, it was important for the arrangement to be as light as possible.
I purchased a floral foam ball and baby’s breath to run a trial centerpiece several weeks before the big day. The trial was a success, so I went ahead and purchased the materials needed to make 10 baby’s breath centerpiece arrangements.
Even using a lighter flower, since the foam ball has to be soaked in water, it will be quite heavy. Due to the weight of the foam ball, we were not able to attach the centerpieces to the mercury silver candlesticks until we were at the reception facility.
Transporting flower arrangements can be challenging and stressful. If you can make the arrangements on site at your event location, it will be to your advantage.
How to Make an Easy DIY Baby’s Breath Centerpiece
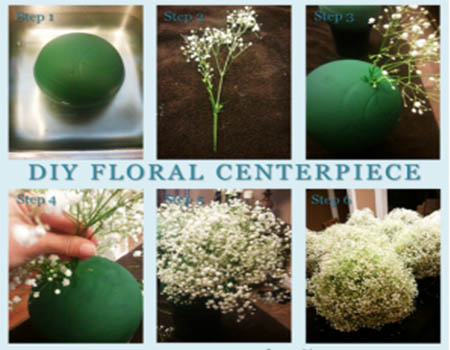
The following materials are what you will need to make 1 Baby’s Breath Centerpiece. Simply multiply the flowers, holders, and foam balls by the number you need to figure out the exact amount you will need for your wedding or event.
To give you an idea on the time commitment needed to make a DIY Baby’s Breath Centerpiece, it took approximately 1 hour per arrangement created.
*Floral Tip – Our arrangements were able to stand on the candlestick holder without toppling over. However, the arrangements were not completely secured. If you think your arrangement could fall over or easily be knocked, we suggest placing the foam ball on a larger base for more security. Definitely, make sure you do a trial run before the big day so there are no surprises!
Materials:
- (3) Bunches of Baby’s Breath
- (1) 8 – 10″ foam floral ball *DO NOT GET THE STYROFOAM BALLS. It needs to be floral foam so the stem of the baby’s breath can easily go through it.
- (1) Mercury Candlestick Holder
- Scissors
- Large Plastic Drop Cloth
- Towel
*Update: I’ve had a lot of requests for where to find the candlestick holders that I used in the picture. These were purchased from Michael’s, circa 2014. Although not exactly the same, the link above is a good alternative. It might even be a better option because of its larger top.
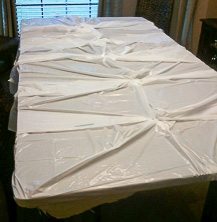
The largest workspace that I had available was our wood dining room table. Since not only was this going to be a mess, but a wet mess, I laid down a layer of plastic sheeting over the table for protection and then a towel to absorb any excess water. Don’t skip this step!
Before you begin, cut the ends of the baby’s breath and place the flowers in water. If you are only making one or two arrangements, you can put the flowers in a vase. Since we had such a large number of flowers needed, we chose to put the flowers in the sink.

Before you begin, cut the ends of the baby’s breath and place the flowers in water. If you are only making one or two arrangements, you can put the flowers in a vase. Since we had such a large number of flowers needed, we chose to put the flowers in the sink.
Step 1: Submerge the Foam Ball in Water
Once your area is prepared and the flowers begin soaking up water, the initial step in building the centerpiece is to take the floral foam ball and submerge it in water. It is very important that the foam ball has water evenly dispersed throughout so it will be necessary to take your hand and press the ball down and turn the ball when it tries to float up.
Once the ball is fully saturated (it will be quite heavy), place it on a secure surface (we used old potting jars with rocks in the bottom).
Step 2: Cut Baby’s Breath to Desired Length
Take a pair of sharp scissors and cut off one strand of baby’s breath approximately 6 – 8″ in length. The length will determine how large the ball will be when complete. The larger the strands, the larger the centerpiece.
Step 3: Add Baby’s Breath to Floral Foam
Insert the cut baby’s breath into the wet foam ball. It should slide in fairly easily. The key here is to do it without bending the stem. If the stem bends, the flowers will not stand upright nor receive a sufficient amount of water.
Step 4: Fill in the Gaps
Continue to cut the stems and insert them into the foam ball, filling in holes as you go. Once you have put 2 bunches of baby’s breath into the foam ball, it may appear as if you are finished. As time passes (even for a day or two), the baby’s breath will begin to slightly thin out. For a fuller ball, it is essential to use all 3 bunches of baby’s breath.
Step 5: Place Completed Arrangement in Cooler or Transport to Location
After all the baby’s breath stems are inserted into the floral foam ball (don’t forget the bottom which will be visible if on the candlestick), the baby’s breath ball is ready for transport.
Step 6: Insert Arrangement onto the Base
Once the baby’s breath balls have arrived at your event location, carefully grab the foam ball and insert it onto the base. Since the mercury candlestick holder was lighter and much smaller than the baby’s breath ball, it was necessary to push the arrangement down several inches. Although this limited the overall height of the arrangement, it added significantly to its stability.
Place a few votives around the bottom for additional ambience and there you have it – a beautiful and elegant floral centerpiece ideal for any occasion. This DIY baby’s breath centerpiece will stay lovely for several days up to a couple of weeks, so consider keeping it or donating it after the event. Hospitals and nursing homes are always appreciative of floral donations!
IF YOU LIKED THIS TUTORIAL ON HOW TO MAKE AN EASY DIY BABY’S BREATH CENTERPIECE, YOU MIGHT ENJOY THE FOLLOWING –


