Once upon a time I started my very first blog. Although that one is retired, it was a wonderful learning experience and gave me the confidence to start the two sites that I manage today. Rather than filing all the old posts away, I’ve decided to bring a few back from the archives, including one of the most popular – How to Make a DIY Wedding Bouquet. Enjoy!
PARTIES & ENTERTAINING
How to Make a DIY Wedding Bouquet
May 12, 2014
The following content may contain affiliate links. If you purchase something from the links, we may receive a commission.

DIY Wedding Flowers
How to Make a Bridal Bouquet, Bridesmaid Bouquet, and Flower Girl Bouquet
With spring in full bloom, many brides-to-be are wrapping up their wedding planning in anticipation of the big day. One of the most costly aspects of the wedding are the floral arrangements. While even the most experienced DIY bride may feel intimidated making large table arrangements, creating a wedding bridal bouquet is easier than you think. In this tutorial, we will give you the basic step-by-step directions for how to make a DIY wedding bouquet, bridesmaid bouquet, and flower girl bouquet.
If you are in the beginning stages of wedding planning, here are a few tips to creating your own wedding bouquet and floral arrangements:
– Pick a basic arrangement style.
Unless you have previous experience creating wedding bouquets, a simple round bridal bouquet is going to be the easiest to make.
– Choose one color for the wedding bouquets.
Using a single color for your bouquet will also simplify the creation process.
– Source out the flowers ahead of time.
It’s important to know well in advance where you are going to source your flowers from. You may be able to buy them in bulk for a discount at your local florist, grocer, or wholesale florist, if there is one in your area.
– Plan where you will store the flowers.
You will need to pick up your flowers a day or two in advance. To keep the flowers in the best shape, they will need to be kept in a cooler. Most people don’t have access to a walk-in cooler, so you will need to make sure you have room in your refrigerator or somewhere else to keep the flowers healthy.
– Collect everything you need for assembly.
Along with the flowers, you will also need some basic tools and materials for assembly. These materials need to be purchased in advance so you are ready the day you plan to make the wedding bouquets.
– Find volunteers to assist in the bouquet making process.
It is a lot of work to create your own wedding bouquets, especially if you have a lot of people in your wedding party. Even if your volunteers don’t have any experience, having an extra hand or two around will make your job significantly easier.
How to Make a DIY Bridal Bouquet
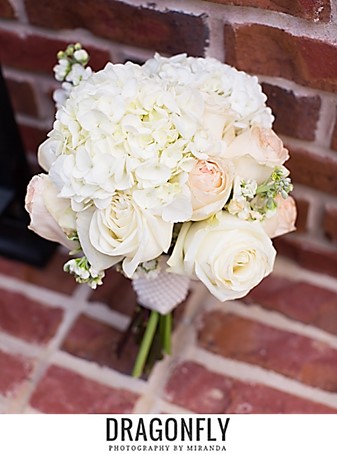
For this tutorial, we will begin with the bride’s bouquet. It requires the most flowers and is the most difficult to assemble. Below are the exact materials needed to replicate the bridal bouquet in the picture.
To make the bridal bouquet (pictured below), the key is to keep the bouquet rounded while adding the flowers. We found the easiest way to do this is by using a rubber band to hold the bouquet in place. Although professional florists typically don’t implement this method, we found it was the easiest way to keep things secure. At the end, we will wrap the bouquet with floral tape and ribbon so the rubber band will be hidden from view.
If you are still deciding which flowers to use for your arrangement, you may want to consider the hydrangea. With large round blooms, hydrangeas make for an easy and beautiful filler for bouquets. The hydrangea comes in a variety of colors so it works with many different styles and color schemes. Keeping with the all-white color scheme, we used an ivory hydrangea, but the blush or blue blooms would make for a beautiful wedding bouquet also.
Creating the Bridal Bouquet

Materials:
- 6 – Garden Roses
- 6 – Regular Roses
- 3 – Hydrangeas
- 4 – Stock
- Rubber Band
- Floral Tape
- Satin Ribbon
- Floral Pins
- Scissors
Step 1: Cut the ends of each stem at an angle and place in water. You will want the stems to be around 8 – 10 inches long.
*Helpful Tip – Bouquets will be in the best shape if made the day-of the wedding, but can be made the day before and stored in a cooler or refrigerator.
Step 2: Begin with 2 of the hydrangea blooms and hold the stems together in one hand. Add in 3 of the garden roses and 3 of the regular roses. To keep the bouquet rounded, add the roses one at a time, filling in any empty spots.
Step 3: Take a rubber band and wrap the stems at least twice over. Do not worry if the stems are too long at this point, we will cut them down later.
Step 4: Add the third hydrangea and fill in the bouquet with the remaining garden roses, traditional roses, and stock. At this point, the bouquet should be getting pretty heavy and full.
Step 5: When you are satisfied with the way the bouquet looks, take another rubber band and wrap all of the stems together. The rubber band should be in the middle point of the stems and as flat as possible. Hold the bouquet in your hands where it feels comfortable. Move the rubber bands up or down where it will not be visible with your hands clasping the stems.
Step 6: Using the scissors (if you don’t have floral scissors, garden sheers will work just fine), cut the bottom of the stems so that the stems are even and the bouquet length is comfortable to hold.
Step 7: Starting at the top of the stems (closest to the flowers in the bouquet), take the floral tape (we prefer green, although it also comes in white) and wrap the stems from about 1 inch from the rounded bouquet down to 3 inches up from the bottom of the stems. Wrap the stems with at least two layers of floral tape making sure to completely cover the rubber bands.
*The wedding bouquet should feel secure at this point.
Step 8: Now for the finishing touches, using the ribbon, wrap the stems at least once over covering the floral tape. Taking the pins tuck in the ends of the ribbon and press the pin through the ribbon and into the stems. The pins should be secured in the base of the bouquet without any sharp ends visible.
If you are using diamonds, pearls, lace, or other decorative features, it can be added at this time.
Take your completed bouquet, place it in a vase with water, and put it in a cool spot (preferably a cooler) until it gets closer to wedding or picture time.
How to Make a Simple Bridesmaid's Bouquet
To make a simple bridesmaid’s bouquet, the key is to use a single type of flower. Not only does this help in keeping the bouquets rounded, but it is also more cost efficient, as you can buy more flowers in bulk. For this tutorial, we’ll be using hydrangeas.
Creating the Bridesmaid’s Bouquet

Materials:
- 3 – 4 – Hydrangeas (per bouquet)
- Floral Tape
- Satin Ribbon
- Floral Pins
- Scissors
Step 1: To make a hydrangea bouquet, start by cutting the stems around 6 – 8 inches. If the blooms are large, you will probably only need to use 3 per bouquet. If the blooms are smaller, 4 hydrangea blooms will make for a sufficient sized bridesmaid bouquet.
*Since you will only be using 3 – 4 stems, a rubber band is not necessary to hold the bouquet together.
Step 2: In one hand, hold the hydrangea stems. Beginning around an inch from the top of the blooms, take the floral tape and secure the stems together. Wrap the floral tape to about 2 – 3 inches from the bottom of the stems. Continue wrapping the stems until the bouquet feels secure.
Step 3: Cut the ends of the stems so that they are even on the bottom.
Step 4: Finish the bouquet by wrapping ribbon over the stems completely covering the floral tape. Take at least 2 floral pins and secure the ends of the ribbon in place.
Place the completed bouquet in a vase with water and store in a cool place.
*Please Note: It is highly recommended to make these the day-of if possible. Hydrangeas can brown quickly if left out of water or in the heat for too long.
How to Make a Flower Girl Wedding Bouquet
Who says a flower girl has to carry a basket and sprinkle rose petals? Not us!
Between church regulations banning real petals, the cleanup required after the ceremony, or working with younger flower girls on proper petal sprinkling behavior, you may be looking for a flower girl alternative to rose petals.
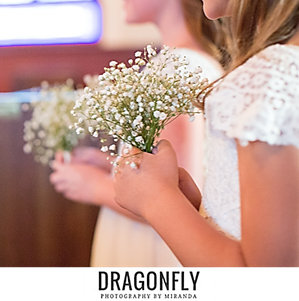
That’s where the flower girl bouquet comes in to play. As with the bridesmaid’s bouquet, we decided to use a single kind of flower for the flower girl bouquet. The light and airy baby’s breath was the perfect flower for little hands.
Making a Flower Girl Bouquet

Materials:
- 3 – baby’s breath stems (per bouquet)
- Floral Tape
- Scissors
Step 1: To make a baby’s breath bouquet, start by cutting the stems to around 5 inches. Baby’s breath stems can be flimsy, so pick three that are in good shape.
Step 2: Hold the baby’s breath stems in one hand and wrap the center of the stems with floral tape. The stems are small so this should be easy. Tear off the floral tape and press the end down securely.
Ribbon could be added at this point, but it is not a requirement, as the girl’s hands will cover up the floral tape.
IF YOU LIKED THIS TUTORIAL ON HOW TO MAKE A DIY WEDDING BOUQUET, YOU MIGHT ENJOY THE FOLLOWING –


