

Once upon a time I started my very first blog. Although that one is retired, it was a wonderful learning experience and gave me the confidence to start the two sites that I manage today. Rather than filing all the old posts away, I’ve decided to bring a few back from the archives, including one of the most popular – 10 Ways to Tie a Chair Sash. Enjoy!
PARTIES & ENTERTAINING
10 Ways to Tie a Chair Sash
June 20, 2014
The following content may contain affiliate links. If you purchase something from the links, we may receive a commission.

When planning a wedding, shower, or other event, there are many decisions to be made. For a seated event, one of the first things to consider is the setup of tables and chairs. Since the tablescape is one of the main focal points in a room, it is important that the selections made are going to give the desired effect.
Do you want a classic event with traditional elements? Does your dream wedding have a rustic feel or more modern undertones? When planning the design aspects of the wedding or event, knowing the general aesthetics will guide you in your decision making.
Once you have set a date and secured the location, you can begin the table planning process. Some locales include tables and chairs as part of the rental fee. Others require you to rent or bring your own. The same goes for table linens. A solid white or ivory tablecloth may be offered. If not, it will be necessary to rent or purchase your own.
Table linens are typically the first selection to be made regarding your tablescape, followed by the chairs. Whether you decide on wooden chairs, white plastic chairs, or chair covers, a chair sash provides a beautiful finishing touch.

Using Chair Sashes
Once you have decided on using chair sashes, then comes the decision on how you are going to tie the chair sashes. There are many ways to tie a chair sash besides the traditional bow. While none of these alternatives are tremendously tricky, the way that you tie the sash is not always intuitive and can also be quite time intensive.
Some points to keep in mind when deciding on which chair sash tie to use:
• What is the length of the chair sash? Is it long enough (or too long) for the desired chair tie?
• What is the difficulty of the chair sash tie?
• How much time will be needed to tie each chair sash?
• Who will be able to help tie the chair sashes on the day of?
For some of these ties, a longer chair sash is preferred while others look better with a slightly shorter sash. It is highly recommended that you practice the tie beforehand, so there aren’t any surprises on the day of.

If you are hiring a day-of wedding planner, make sure to discuss these options with them ahead of time. Tying 100+ chair sashes is a HUGE job for one person. You will want to ensure that you have the right people on hand for the day of, so everything goes smoothly. Some rental companies will also provide setup for an additional fee.
Now let’s jump to it! We have rounded up 10 different ways to tie a chair sash, including the traditional bow plus 9 alternatives. Listed below are pictures of each of the ways to tie a chair sash with basic instructions to help clarify some of the trickier ones.
In this tutorial, I used a white square back chair cover with an ivory pin-tuck chair sash.
Different Ways to Tie a Chair Sash
 The Bow – Chair Sash
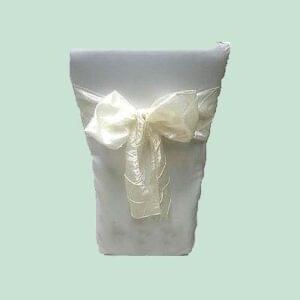
The bow is a traditional chair sash favorite for two reasons. First, it is easy to tie. The traditional bow is as simple as tying shoelaces. Because of its simplicity, it is also one of the fastest chair sashes to tie making it a great option if you are hosting a large event with many chairs.
To make the bow, hold an end of the chair sash in each hand. Wrap the sash around the front of the chair back. Cross one end of the sash over the other end and pull tightly. Make a loop with one side of sash. Wrap the other side around the loop, tucking it under to create a second loop. Adjust the tail and tighten as needed.
The Side Bow – Chair Sash
The first alternative to the traditional bow is the side bow. This look is very easy to create since it follows the same steps as the traditional bow. To create this look, you will follow the same instructions as the traditional bow, but rather than centering the bow on the back of the chair, you will slide it to the left or right side.
If you are wanting something slightly different from the traditional bow, but without the additional time or learning constraints, this may be the option for you. It is easy to do and should be an acceptable alternative for a wedding planner or rental company.
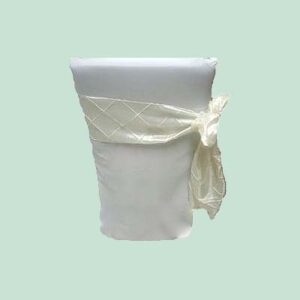
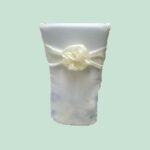
The Knot – Chair Sash
The knot is a very simple chair sash tie and is second in simplicity only to the bow. It is one of the fastest and easiest alternatives providing a slightly different and more modern look in comparison to the traditional bow.
To make the knot, hold an end of the chair sash in each hand. Wrap the sash around the front of the chair back. Cross the ends of the sash and loop one side over the other. Tie the ends in a tight knot and let the ends hang down the back of the chair. Depending on the length of your chair sash and the desired look, creating a double-knot may be necessary.

The Side Knot – Chair Sash
If you like the sleekness of the knot, you might also consider the side knot. This is an easy alternative to the knot, where the knot is placed to the side of the chair rather than in the center of the back. To make a side knot, follow the directions to the traditional knot. Once the knot is secured, slide the knot to the left or right of the chair.
Please note, on the side chair ties, it is important that the knots are secured tightly. These types of chair ties are slightly more likely to slide down if not tied properly.
Double Wrap Knot – Chair Sash
The double wrap knot is a great tie option if your chair sash is on the longer side. This chair sash option will give an extra splash of color while still preserving the lovely aspect of a knot (or bow) in the center.
To create the double wrapped knot, start at the middle of the chair (rather than the top). Take each end and wrap it around the chair crossing at the front (this is different than the other alternatives that crossed at the back). Take the ends and wrap it around the front (like a traditional bow) and cross over the ends in the back. Finish it off by tying either a knot or bow.
Double Wrap Side Knot – Chair Sash
The double wrap side knot can be a little trickier than the double wrap knot since it requires the right amount of tension on the chair sash to hold in place. Before deciding on this alternative, make sure to practice it a few times before the big day.
To create the double wrapped side knot, take the ends of the sash and wrap it around the side of the chair. Cross over on the alternate side and then loop one end over the other on the first side. Tie a knot or bow depending on the desired look and amount of fabric remaining.

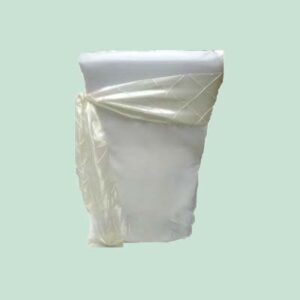
The Flip Over – Chair Sash
The flip over is a sleek alternative to the traditional chair sash and is quick and easy to make.
For the flip over, follow the instructions to make a standard knot. Then take the longer hanging end and flip it under and over the top of the knot. Since this chair sash was a little bit longer, I flipped it over a second time to achieve the desired length. Straighten and smooth the flap as needed.
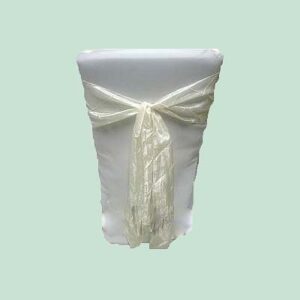
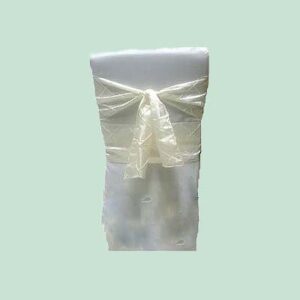
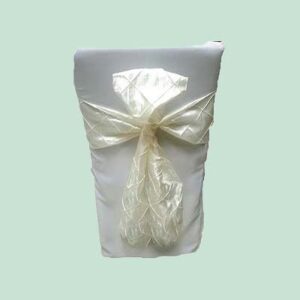
The Rosette – Chair Sash
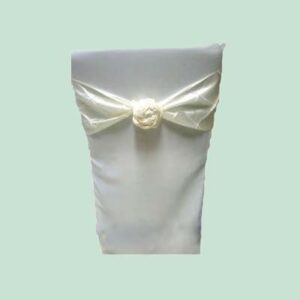
The rosette is another chair sash alternative that is beautiful, but more time-consuming. If you are going to do the rosette on a large number of chairs, make sure that you have plenty of time or several people to assist with the tying.
To make the rosette, wrap the ends of the chair sash around the chair as if making the traditional bow. Pull one end over the other to secure in place. Begin twisting one end of the sash over the other until you have a small amount of sash left at the ends (a few inches at most). Wind the twisted sash in a circle around the center back of the chair until a rose-shape is formed. Tuck the hanging ends to hold it in place.
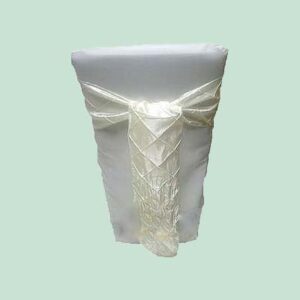
 The Double Loop Flower – Chair Sash
The double loop flower is similar to the rosette, but slightly faster to make. Although it is an easy chair sash, it does require more time than some of the other ones listed above so make sure to have plenty of hands available if you need to do this for several (or several 100!) banquet chairs.
For the double loop flower, follow the steps to make the traditional bow making sure that the loops are relatively small. Then, make another bow with the hanging ends.
There should be four loops and two small hanging ends. Fluff the loops and tuck each loop over the adjacent loop. Then take each end and lightly tuck it under (or over depending on the direction the end is hanging).
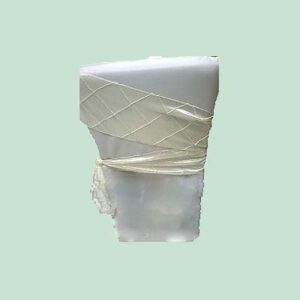
The Obi – Chair Sash
The obi is one of the more difficult knot forms and is more time consuming than the bow and knot alternatives.
To create the obi, wrap the sash around the chair as if you were creating a bow. Flip one end over the other and pull. Now, rather than creating a bow, hold one of the ends in your left hand. Take the other end and wrap it clockwise behind and around the piece in your left hand. Pull the piece in your right hand under itself to tie it.
If this seems too challenging, an alternative to this is the one-looped bow. Rather than making a traditional bow, make one of the loops larger and leave the other loop smaller. Then make sure that the ends that are hanging cover over the smaller loop.
IF YOU LIKED THIS TUTORIAL ON 10 WAYS TO TIE A CHAIR SASH, YOU MIGHT ENJOY THE FOLLOWING –
